Introduction
Managing SharePoint permissions becomes critical when allowing document access while preventing downloads. Organizations often need to authorize external partners or consultants to view sensitive documents without the ability to download them.
The default Read permission level automatically includes the ability to download files, creating a security challenge. SharePoint Online offers multiple methods to block downloads, but custom permission levels provide the most granular and cost-effective approach.
Cost Benefit
Custom permission levels work with standard SharePoint Online capabilities, without requiring premium licenses like Microsoft Entra ID Premium or SharePoint Advanced Management.
Available Methods to Block SharePoint Downloads
Before exploring custom permission levels, let's examine the different approaches available:
1. Sharing Link Restrictions
- Principle: Selecting the "Cannot download" option when sharing
- Limitation: Applies only to the specific link, not global access
- Use: Ideal for one-time document sharing
2. Entra ID Conditional Access Policies
- Principle: Restriction based on user risk, device, or network
- Prerequisite: Microsoft Entra ID Premium (P1 or P2)
- Limitation: No site-level control
3. Site-Level PowerShell Policy
- Principle: Blocking downloads, printing, and synchronization
- Prerequisite: Microsoft Syntex SharePoint Advanced Management license
- Scope: Entire SharePoint site
4. Information Rights Management (IRM)
- Principle: Restrictions via Purview Information Protection
- Drawbacks: Disables co-editing and Office Online
- Complexity: Advanced configuration required
5. Custom Permission Levels (Recommended)
- Advantage: Granular control without additional cost
- Flexibility: Management based on members and groups
- Compatibility: Works with standard SharePoint capabilities

Prerequisites and Required Permissions
Required Permissions
Only users with the following roles can create custom permission levels:
- Site Collection Administrators: Full authority over the collection
- Site Owners: Members of the default Owners group
- SharePoint/Global Administrators: Must add themselves to the site with full control
Creating a "Read Without Download" Level
Creating a custom permission level based on Read allows users to view documents without downloading them.
Access Site Settings
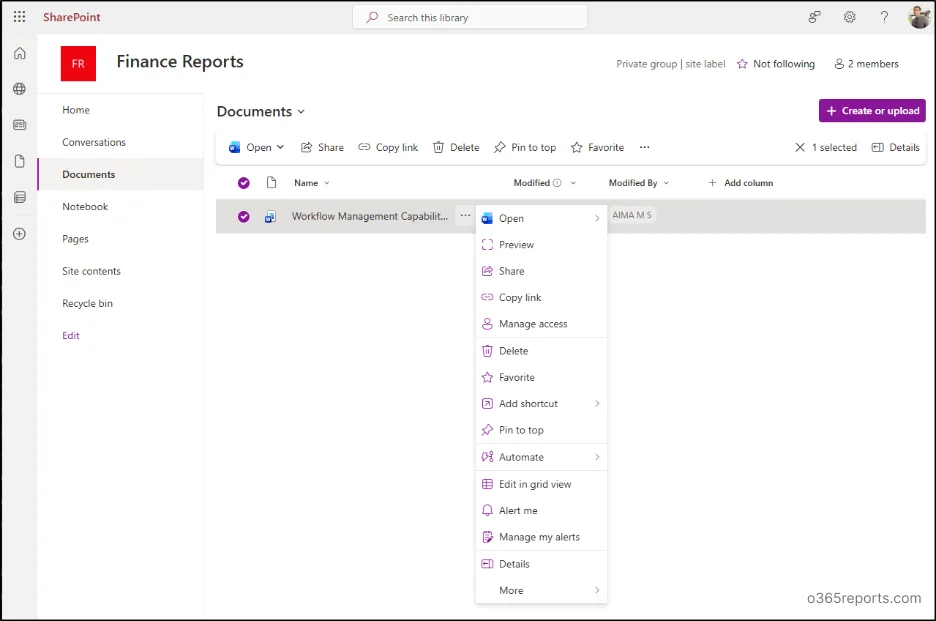
Navigate to the target SharePoint site, then click the Settings icon (⚙️) and select Site Permissions.
Classic Permissions Mode
Select Advanced Permission Settings to access the classic SharePoint permission management page.
Access Permission Levels
In the command bar, click Permission Levels to display existing levels.
Copy Read Level
Scroll down and click Copy Permission Level by selecting the Read level as the base.
Configure New Level
Assign an appropriate name (e.g., "Read - No Download") and explicit description to the permission level.
Disable Critical Permissions
Uncheck the following permissions:
- "Open Items" under List Permissions
- "Use Client Integration Features" under Site Permissions
Automatic Effect
Disabling "Open Items" automatically removes the "View Versions" permission.
Finalization
Click Create to save the new custom permission level.
"Edit Without Download" Level
For users who need to edit documents without being able to download them, a level based on Edit can be created following the same process.
| Feature | Standard Edit | Edit - No Download |
|---|---|---|
| Browser Editing | ✅ Available | ✅ Available |
| File Download | ✅ Allowed | ❌ Blocked |
| Desktop Applications | ✅ Accessible | ❌ Restricted |
| Synchronization | ✅ Possible | ❌ Blocked |
| Version History | ✅ Viewable | ❌ Inaccessible |
Assigning Custom Permission Levels
Direct Assignment to Users and Groups
Direct assignment allows precise control over individual permissions.
Navigate to Permissions
Access Settings (⚙️) → Site Permissions → Advanced Permission Settings.
Assign Permissions
Click Grant Permissions and enter the security group name or users.
Select Custom Level
In the Select a Permission Level dropdown, choose the custom level you created.
Validation
Click Share to apply the new permissions.
Assignment to Default SharePoint Groups
Managing permissions via default groups (Owners, Members, Visitors) simplifies administration and maintains consistency.
Sites Not Connected to a Microsoft 365 Group
For traditional SharePoint sites, modifying group permission levels is straightforward:
Select Group
In advanced permission settings, select the Site Visitors group (or target group).
Modify Permissions
Click Edit User Permissions in the command bar.
Replace Level
Uncheck the existing level (Read) and select the custom level (Read - No Download).
Apply
Click OK to validate the changes.
Sites Connected to a Microsoft 365 Group
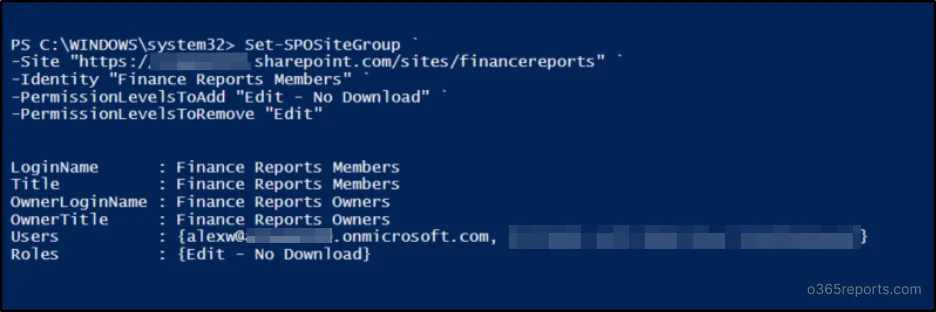
Sites connected to a Microsoft 365 group have interface restrictions to preserve multi-service integrity. PowerShell becomes necessary:
1# Assign "Read - No Download" level to visitors2Set-SPOSiteGroup -Site "<Site URL>" -Identity "<Group Name>" -PermissionLevelsToAdd "Read - No Download" -PermissionLevelsToRemove "Read"3 4# Assign "Edit - No Download" level to members5Set-SPOSiteGroup -Site "<Site URL>" -Identity "<Group Name>" -Identity "<Group Name>" -PermissionLevelsToAdd "Edit - No Download" -PermissionLevelsToRemove "Edit"Verify Existing Permissions
Before assigning a custom level, verify that the user doesn't have a higher level that would override the restrictions.
Enhanced Protection with Information Rights Management (IRM)
For enhanced protection of sensitive documents, Information Rights Management effectively complements custom permission levels.
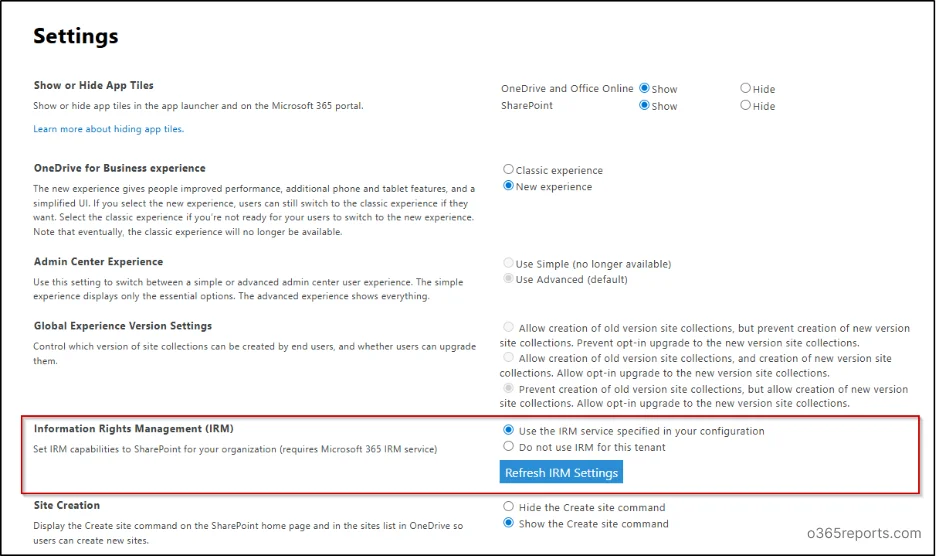
Configuring IRM at Tenant Level
Access Admin Center
Navigate to the SharePoint Admin Center and access Settings.
Classic Settings Page
Select Classic Settings Page to access IRM options.
Activate IRM
Enable Use the IRM service specified in your configuration and click Refresh IRM Settings.
Save
Select OK to save the tenant configuration.
Activation Delay
IRM settings can take up to one hour to become available in SharePoint libraries.
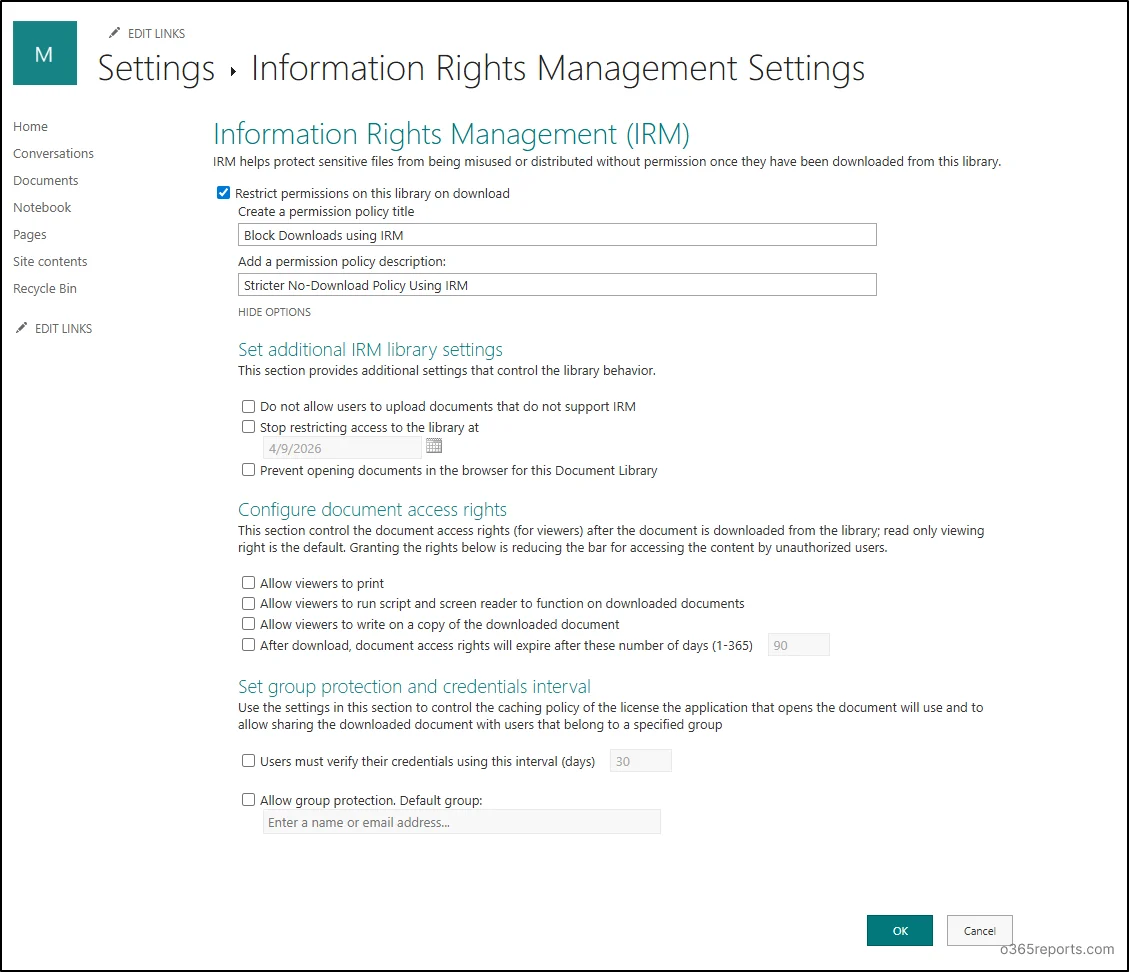
Configuring IRM on a Document Library
Once IRM is enabled at the tenant level, configuration can be applied to individual libraries:
Library Settings
Access Settings → Library Settings → More Library Settings.
IRM Section
Under Permissions and Management, select Information Rights Management (IRM).
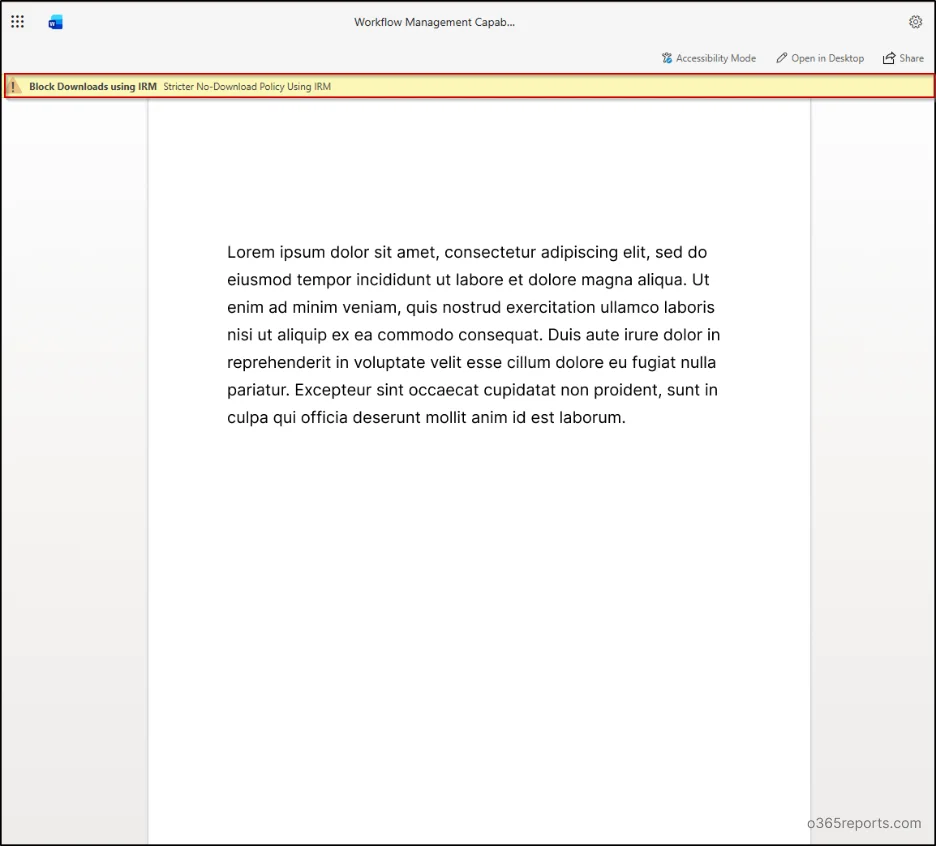
Activate Restrictions
Enable Restrict permissions on this library when downloading.
Configure Policy
Enter an explicit Permission Policy Title and Description.
Advanced Options
Select Display Options to configure expiration, printing, copying, etc.
Finalization
Click OK to apply the IRM policy to the library.
Testing and Validation of Configurations
Validating custom permission levels requires thorough testing with different user profiles.
Test Scenario: Edit Without Download
A user "Alex" member of the Finance Members group with the Edit (No Download) level can:
- ✅ Open documents in the browser
- ✅ Edit and save files
- ✅ Collaborate in the library
- ❌ Access the download option
Test Scenario: Read Without Download
A user "Freddy" member of the Finance Visitors group with the Read (No Download) level can:
- ✅ View documents in the browser
- ❌ Edit files
- ❌ Download documents
- ❌ Synchronize the library
Testing Best Practices
Always test systematically with real user accounts to validate expected behavior before production deployment.
Advanced Security Considerations
While custom permission levels effectively prevent downloading, some limitations remain:
- Text Copy: Content can be copied from the browser
- Screenshots: Users can visually capture content
- Manual Recreation: Possibility to manually recreate information
For maximum protection of sensitive data, combine custom permission levels with:
- Comprehensive IRM policies
- User activity monitoring
- Security awareness training
- Document classification and labeling
Practical PowerShell Scripts
Script for Creating Custom Permission Level
1# Connect to SharePoint Online2Connect-SPOService -Url "https://contoso-admin.sharepoint.com"3 4# Configuration variables5$SiteURL = "https://contoso.sharepoint.com/sites/finance"6$CustomPermissionName = "Read - No Download"7$GroupName = "Finance Visitors"8 9# Assign custom level10Set-SPOSiteGroup -Site $SiteURL -Identity $GroupName -PermissionLevelsToAdd $CustomPermissionName -PermissionLevelsToRemove "Read"11 12Write-Host "Custom permission level applied successfully" -ForegroundColor GreenScript for Checking Permissions
1# Check user permission levels2$SiteURL = "https://contoso.sharepoint.com/sites/finance"3$UserEmail = "alex@contoso.com"4 5# Get user permissions6$UserPermissions = Get-SPOUser -Site $SiteURL | Where-Object {$_.LoginName -like "*$UserEmail*"}7$UserPermissions | Select-Object LoginName, GroupsTechnical Terms Glossary
Permission Level: Set of permissions defining authorized actions in SharePoint.
IRM (Information Rights Management): Document protection technology that controls usage after download.
Site Collection: Hierarchical set of SharePoint sites sharing common settings.
Security Group: Collection of users facilitating permission management.
Conditional Access: Context-based policies to control resource access.
SharePoint PowerShell: Command-line interface for SharePoint administration.


